
Cocktail Table Cabinet
| Some time after I finished the upright cabinet I decided I "needed" a cocktail cabinet. I had see a few MAME cocktails before, and even fewer custom built, so finding good plans was difficult. I had no access to an actual cabinet, so I asked questions, looked a pics of old Ms. Pac-Man and Galaga cocktails (the style I wanted) and made a set of plans as accurate as I could make them. It might not be perfect, but I think its pretty close to the original. |
| The first thing was to make some plans for the cabinet. I had mad a good set of plans for the upright cabinet and that had made life much easier. This time I made some full size drawings of the more complex things like the control panel sides and the top of the unit to use as templates. All the drawings I made can be downloaded from the drawings page. |  |
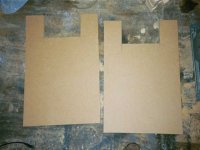 |
I started buy cutting out all the pieces and making sure everything fit. I made this cabinet out of MDF (medium density fiberboard) instead of particle board like the upright cabinet MDF has a much smother surface and needs almost no surface preparation before painting. It also seems to not be as hard on the cutting tools and holds screws better than particle board. |
| Next I added corner braces to the inside corners of the main cabinet. I chose to make them out of 2x2s cut to about 3" long. This let me screw through the outside and into the blocks with long screws for extra strength. I also used wood glue in every joint to make sure nothing would come loose. One important thing to remember is that you CANNOT screw into the edges and expect it to stay together very long. |  |
 |
Next I started to assemble all the sides and bottom into something that was starting to resemble a cocktail cabinet. I made sure to glue the corners and use at least 2 screws per brace block. I sank the screw heads slightly below the surface of the MDF so I could fill the screw holes before I finished the sides. |
| Now it was time to add the hinged top assembly. You cannot use standard hinges because you cannot put screws into the edges of the MDF. The hinges that are needed are called overlap hinges and let you put screws on the edge and the face of the material for extra strength. I also routered the places where the hinges are mounted so there would not be a gap between the 2 pieces of the back. |  |
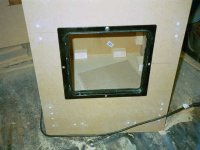
| Next I added the holes for the coin door and the lighted Menu, Pause, and Enter buttons. | 
|
 |
Now it was time to work on the control panel housings. I made a template to cut out the sides of the control panels because of the complexity of the pieces. |
| Next I added metal brackets and a bottom plate. I am planning to make this a modular control panel like the upright cabinet just on a smaller scale. |  |
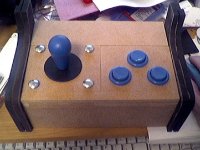 |
Here is the finished "Mini" modular contol panel. Check the modular control panel page to see the details of this control panel. |
| This is as far as I have gotten on the cocktail cabinet. Please check back later, as I will be adding the monitor housing and the ventilation and speaker openings and hardware very soon. |
| HOME | UPRIGHT | COCKTAIL |
| CONTROL PANEL | LINKS |